
HTML parsing libraries are one of the most crucial entities to convert the vast unstructured data that is 85–90% of daily generated data(source). Moreover, this data is not readily available for data miners to perform further processing.
Web Scraping allows developers to access the data repository available on the internet and store it in a structured format for further relevant usage. HTML Parsers play a significant role in converting this unstructured raw HTML data extracted using web scrapers into a suitable format.
A proper HTML parser should be a necessity for your web scraping tasks as it plays a crucial role in latency improvement and ease of extracting data from the web. HTML parsers are loaded with several features and methods that not only save you time but also ensure accuracy and efficiency in data extraction.
In this tutorial, we will explore various HTML parsing libraries in JavaScript with their basic usage examples.
Cheerio
Cheerio is a popular HTML parsing library in JavaScript that is based on JQuery and is used for refining HTML and XML documents to obtain the desired data.
Cheerio was developed as a lightweight alternative to JSDom for parsing complex HTML websites. Additionally, it is a very user-friendly library, and its installation is quite simple. You can execute the following command in your project terminal to install it.
npm i cheerio
Let’s take a look at this website. We will retrieve the product titles and their pricing from the webpage. It is important to note that, before parsing and analyzing the HTML structure, we need an HTTP requests library to access the web page.
Let us install Unirest JS to generate an HTTP connection with the target URL.
npm i unirest
Next, we will create a scraper using Unirest to download the HTML code of the web page.
const unirest = require("unirest");

const getHTML = async(url) => {

    const response = await unirest.get(url);

    if(response.status == 200){
        return response.body
    }
}
Step-by-step explanation:
- In the first line, we imported the Unirest library, which is used for establishing an HTTP connection with the web servers.
- Next, we declared the function
getHTMLto perform all the tasks related to scraping HTML data. - After that, using the
unirest.getmethod, we sent an HTTP GET request to the target URL. Theawaitkeyword is used here to wait for the response. Finally, the response is stored in theresponsevariable. - Then, we check if the HTTP status code is equal to 200, which indicates a successful request. If it is true, then the
ifblock is executed.
Our scraping part is complete. Now, we will locate the tags of the required data entities from the HTML.
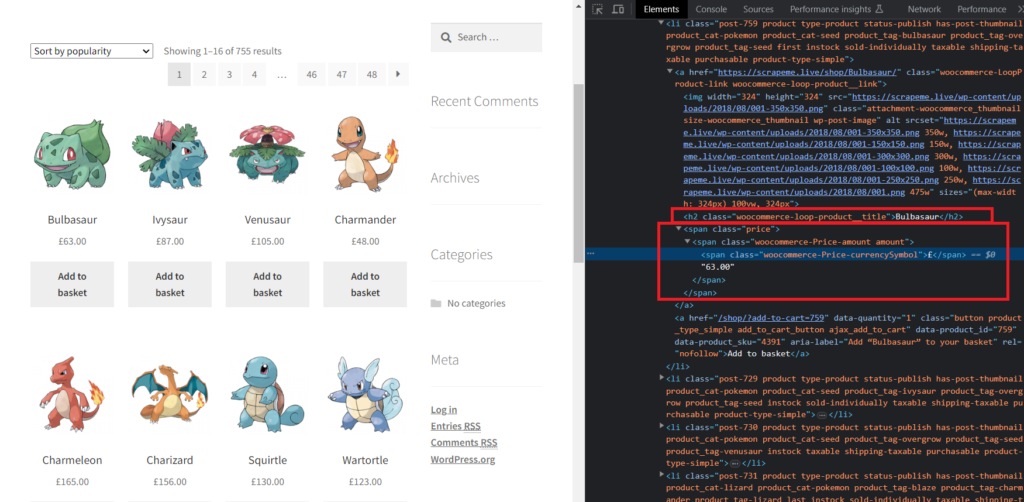
As you can see in the above image, the product name is under the tag h2 and the pricing is contained inside the span tag with class price.
Next, we will import the Cheerio library and parse the HTML to get the respective data.
const cheerio = require("cheerio");

const parseHTML = async () => {
  let url = "https://scrapeme.live/shop/";

  let html = await getHTML(url);

  let $ = cheerio.load(html);

  let products = []; // Initialize the products array

  $("li.product").each((i, el) => {
    products.push({
      product_names: $(el).find("h2").text(),
      product_pricing: $(el).find(".price").text(),
    });
  });

  console.log(products);
};

parseHTML();
In the above code, we created the parseHTML function to deal with the parsing operations. After initializing the URL, we loaded the HTML into the Cheerio instance. Finally, we ran a loop over all the products that are available on the page to retrieve their title and pricing.
The find() method of Cheerio makes it extremely simple to locate and target any element. For example, finding the product links on the page is a hassle-free task and can be done by running $(el).find(“a”).attr(“href”).
Overall, Cheerio is a faster, user-friendly, and simple-to-use library that can parse complex HTML documents with excellent efficiency. It supports a wide range of methods to target a particular HTML element and has good documentation and community support, making it suitable for beginners.
Check out this documentation to learn more about Cheerio.
JSDOM
JSDOM is a JavaScript implementation of notably DOM and HTML standards. Its goal is to allow you to create and manipulate HTML documents for testing real-world applications. It not only works as a parser but also as a web browser.
Key features associated with JSDOM are:
- Server-Side Rendering — One of the most common tasks JSDOM is used for is server-side rendering. It allows developers to render HTML on the server and send it to the client to improve the SEO and performance of the website.
- Executing Scripts —Scripts can be executed in JSDOM, enabling developers to modify the content of the web page and gain access to the web platform APIs JSDOM implements.
- Headless Browser — JSDOM cannot render visual content but can act like a headless browser, which can be further used for web automation tasks.
Let’s try to scrape the same website we used in the above section. But first, we need to install this library.
npm i jsdom
Here is the complete code:
const unirest = require("unirest");
const { JSDOM } = require("jsdom");

const getHTML = async (url) => {
  const response = await unirest.get(url);

  if (response.status == 200) {
    return response.body;
  }
};

const parseHTML = async () => {

    const url = "https://scrapeme.live/shop/";

    const html = await getHTML(url);

    const dom = new JSDOM(html);
    const { document } = dom.window;

    const products = [];

    document.querySelectorAll("li.product").forEach((el) => {
      products.push({
        product_names: el.querySelector("h2").textContent,
        product_pricing: el.querySelector(".price").textContent,
      });
    });

    console.log(products);
};

parseHTML();
Now, you know the getHTML function. Let’s discuss what we are doing in the asynchronous parseHTML function using JSDOM:
- After extracting the HTML content, we created an instance of JSDOM by passing the HTML content to JSDOM(
JSDOM(html)). - Next, we extracted the document object representing the DOM of the HTML page from the JSDOM window’s property.
- Then, we initialized the product array and used the
document.querySelectorAll()function to loop over all the products to get the required information.
This was the basic usage of JSDOM. If you want to learn more, please check out this documentation.
HTMLParser2
HTMLParser2 is a stream-based fast HTML parser that can efficiently handle large HTML documents. However, it is different from HTMLparser and should not be associated.
Run the following command to install this library.
npm i htmlparser2
This library can be used as follows for parsing the HTML data.
const unirest = require("unirest");
const htmlparser = require("htmlparser2");

const getHTML = async (url) => {
  const response = await unirest.get(url);

  if (response.status == 200) {
    return response.body;
  }
};

const parseHTML = async () => {

    const url = "https://scrapeme.live/shop/";

    const html = await getHTML(url);

    const products = [];
    let product = {};

    const parser = new htmlparser.Parser({
        onopentag(name, attributes) {
          if (name === 'h2' && attributes.class === 'woocommerce-loop-product__title') {
            parser._tag = 'title';
            product = {};
          }
          if (name === 'span' && attributes.class === 'price') {
            parser._tag = 'price';
          }
        },
        ontext(text) {
          if (parser._tag === 'title') {
            product.title = text.trim();
          }
          if (parser._tag === 'price') {
            product.price = text.trim();
          }
        },
        onclosetag(name) {
          if (name === 'h2' && parser._tag === 'title') {
            products.push(product);
            product = {};
          }
          if (name === 'span' && parser._tag === 'price') {
            parser._tag = ''; // Reset the price flag
          }
        }
      }, { decodeEntities: true });

    parser.write(html);
    parser.end();
    console.log(products);
};

parseHTML();
Step-by-step explanation:
- First, we imported both the libraries needed to perform this task.
- After that, we created an asynchronous function
getHTMLto extract the HTML data, which I have already explained. - Then, we made another asynchronous function
parseHTMLfor handling the parsing-related tasks. We also initialized the URL and called thegetHTMLfunction to get the HTML content. - Next, we created an instance of
htmlparserto parse the HTML content. - If an
opentagis encountered, we are checking if the tag is anh2element with the classwoocommerce-loop-product__title. If it is true, we initialize the product object and_tagproperty ofparserto thetitle. If it’s aspantag, with the classprice, then, we set the _tag property of the parser toprice. - When our parser encounters the text content within the HTML element, we check if the parser property is equal to “title”, meaning if we have opened the product title. If this is true, then we store the text content as the product title. We followed the same method for extracting the pricing but with a different
_tagproperty of the parser. - Then, the function
onclosetagis executed when we encounter an HTML closing tag. We check if it is ah2tag; if yes, then we push the product data in the products array and re-initialize the value of the product object to store the data for the following products. If we encounter the span tag, then we reset the value ofparser._tagto stop the data capture process. - Afterward, we used the
parser.write()method to begin the process of parsing with the extracted HTML data. - Finally, we end the parsing process by calling
parser.end()method.
HTMLParser2 has a large community support and excellent documentation. However, it can be challenging for beginners to learn, unlike Cheerio JS, and requires writing more code to complete a particular task.
DOMParser
DOMParser is a built-in library offered by JavaScript for parsing HTML and XML documents. All modern browsers support this parser.
Pros:
- Support across modern browsers makes it a reliable choice for parsing HTML documents in a cross-browser manner.
- There is no need to download it externally, as it is a built-in library.
- It offers great control over the entire parsing process.
Cons:
- It is relatively slower as compared to third-party libraries like Cheerio JS.
- Error handling is not good comparatively.
- Limited community support.
Here is the code to use this library:
const unirest = require("unirest");
const cheerio = require("cheerio");

const getHTML = async(url) => {

    const response = await unirest.get(url);

    if(response.status == 200){
        return response.body
    }
}


const parseHTML = async () => {
    const url = "https://scrapeme.live/shop/";

      const html = await getHTML(url);

      // Create a DOMParser instance
      const parser = new DOMParser();

      // Parse the HTML content
      const doc = parser.parseFromString(html, "text/html");

      const products = [];

      // Query the parsed document using standard DOM methods
      const productElements = doc.querySelectorAll("li.product");

      productElements.forEach((el) => {
        products.push({
          product_names: el.querySelector("h2").textContent,
          product_pricing: el.querySelector(".price").textContent,
        });
      });

      console.log(products);
  };

parseHTML();
Parse5
Parse5 is another HTML parsing library that works both in a browser environment or frontend and backend in Node JS environments. It can even parse HTML5 documents easily and with precise accuracy.
Here is an example of usage for this library:
const parseHTML = async () => {
  const url = "https://scrapeme.live/shop/";

  const html = await getHTML(url);

  const parsed = parse(html);

  const products = [];

  const traverse = (node) => {
    if (node.nodeName === "li" && node.attrs.some(attr => attr.name === "class" && attr.value === "product")) {
      const product = {
        product_names: node.childNodes.find(n => n.nodeName === "h2").childNodes[0].value,
        product_pricing: node.childNodes.find(n => n.nodeName === "div" && n.attrs.some(a => a.name === "class" && a.value === "price")).childNodes[0].value,
      };
      products.push(product);
    }

    node.childNodes.forEach((childNode) => {
      traverse(childNode);
    });
  };

  traverse(parsed);

  console.log(products);
};

parseHTML();
Pros:
- It has millions of downloads per week due to its robust infrastructure and great community support.
- It is memory efficient compared to most of the HTML parsing libraries.
Cons:
- The documentation is the worst you can get. They have provided names of the methods, however, there is no explanation available.
Conclusion
In this tutorial, we discussed various HTML Parsers in Node JS. Deciding the best among them will depend upon your project requirements.
If asked personally, I would choose Cheerio because of its ease of use, efficiency, and faster rate of work.
If you believe we can complete your web scraping tasks, you can register for our Web Scraping API. If you need assistance with data extraction, please feel free to contact us.
I hope this tutorial gave you a complete overview of HTML parsers in JavaScript. Please do not hesitate to message me if I missed something. Follow me on Twitter. Thanks for reading!
Additional Resources
I have prepared a complete list of blogs to learn web scraping that can give you an idea and help you in your web scraping journey.